How To Refinish Your Hardwood Floors: Begin Sanding with the Large Belt Sander
We continue our hardwood floor refinishing series. We dive into the nitty gritty of belt sanding. This can be intimidating to anyone who doesn't have experience with heavy machinery. A lot can go wrong here if you aren't careful, so we recommend paying extra attention before you begin anything.
This is it, we are ready to begin the project. By now you may have already noticed that your belt sander will not hook up to a regular power outlet in your wall. This is something the rental store should have made very clear as well when renting the machine.
Getting Power to Your Large Belt Sander
You will need to call an electrician to connect the machine straight into your fuse box. DO NOT try attempting this yourself, it is very dangerous, and only experienced professionals should do so.
Your electrician will safely connect the large 3 gauge wire into a breaker, which he will then plug into the main rails in the fuse box. This way, if something shorts, it will simply blow the breaker.
After the wire is connected to the fuse box and you are ready to go, stop before plugging the other end into your belt sander. I’d recommend installing your sanding paper.
Again, every belt sander is different and this is a tutorial on simply guiding you in the technical process of correctly sanding your hardwood flooring; so I will stay out of the details on how to install paper.
Other things I cannot specify: how to sand with the machine. This is not what this guide is meant for and can vary greatly depending on what machine you rented.
Cross-Cutting Your Hardwood Floor
After installing your 50-grit paper and starting the machine, the first step involves cross-cutting the hardwood flooring at a 45-degree angle. Many “how-to’s” do not tell their readers this and I believe it is very misleading.
This is one of the core concepts when sanding a terribly worn and uneven floor. If you do not begin your first sanding pass on a 45-degree angle, the drum of the big sander will simply follow the exact same divots and chatter/low spot marks from the previous sanding process.
Starting on a 45-degree angle with the drum sander eliminates all of these marks and helps in completely evening out the flooring. With this first pass, you should see quite a bit of finish being removed from the floor. Some finish may still remain and that is completely fine.
After completion of the 45-degree angle sanding pass, you will want to turn off the machine and slide on a second brand-new 50-grit belt. This is because when cross-cutting the floor, you must always go back and do your straight pass with the same grit paper to properly remove any scratch marks left from the cross-cutting.
With this next pass, you will want to go completely straight with the hardwood flooring. This is a very aggressive pass and you must be very careful not to create any new drum marks or other sanding marks.
With this pass you should be completely removing all finish off of the floor, if you still see a lot of finish and marks\color remaining on the floor then this is a good indicator that you have unfortunately started with too fine of a grit.
If this occurs, swap belts to a 36 grit and redo the sanding with the 36-grit belt, and follow up again with the 50-grit belt. After completing the room with your 50-grit straight sanding pass, it is time for the final step with the belt sander.
Sanding Inspection and Final Pass
Before this step, I’d recommend to re-empty your bag no matter how little sawdust is actually in it because the sawdust from the lower sanding grits can be a bit heavier and sticker and not mix well in the bag with the finer dust from the lighter papers. This can cause your bag to clog more often.
Now that you are away from your machine it is a good time to inspect the floor after your straight pass with the 50-grit paper. Is all the finish removed? Is the floor still shiny with finish in some spots? If it is, the job is not done.
If you see a lot of finish still left over on the floor and you have not swapped to a 36-grit belt then it is a good idea to slap on another fresh 50-grit belt and do another sanding pass through the entire room to ensure the floor is properly stripped of all of its finish.
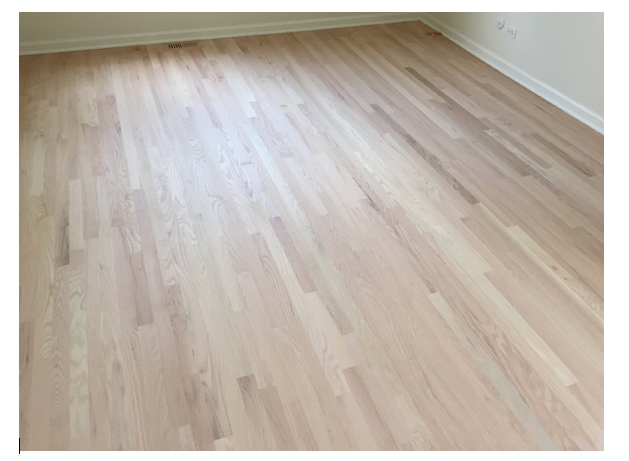
This is what your floor SHOULD look like.
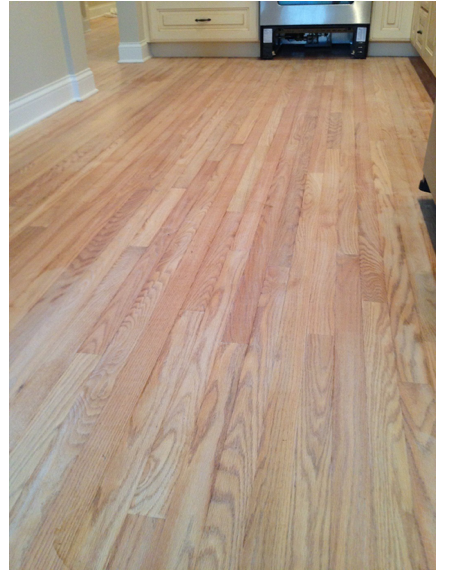
This is NOT what your floor should look like.
After emptying your bag, install your fresh 80-grit sanding belt. You must sand the room a third and final time with the 80 grit. Be sure to sand as straight and level as possible, just like with your 50-grit pass.
After this final pass, you are finished with the big belt sander. Be sure to empty the bag and clean the machine to return to the store as you have rented it. It’s time to take care of the edges.